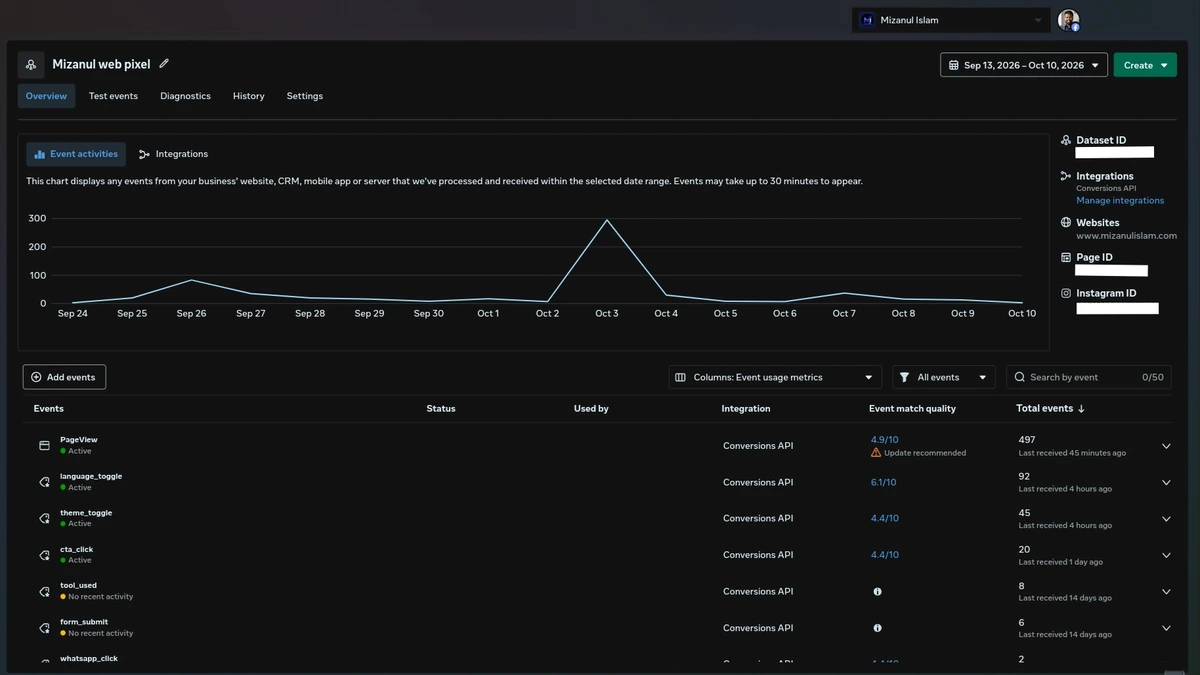
Browser pixels alone are no longer enough. iOS App Tracking Transparency (ATT) and ad blockers block a large share of client-side events. Meta CAPI sends events from your server so Facebook still gets purchase and lead data.
Here is how I set it up, and what to watch for.
Why Browser Pixels Are Not Enough
Since iOS 14.5, Apple has required apps (including browsers) to ask permission before tracking users across sites. Many users decline. On top of that, ad blockers and privacy-focused browsers strip tracking scripts entirely.
The result: your browser pixel fires, but Meta may never see the event. Your attribution breaks down, your optimization suffers, and your ROAS looks worse than it actually is.
Server-side tracking bypasses all of this. Instead of relying on the user's browser, your server sends events directly to Meta.
What is Meta CAPI?
Meta Conversions API (CAPI) is a server-side way to send events to Meta. Instead of (or in addition to) a browser pixel, your backend sends event data through Meta's API.
The events are the same — Purchase, Lead, CompleteRegistration — but they come from your server, not the user's browser.
event_id.
The Three Big Wins
1. Signal Recovery
Events blocked by iOS or ad blockers still reach Meta through the server. This means more conversions tracked, better optimization, and more accurate ROAS.
2. Better Event Match Quality
Event Match Quality (EMQ) is Meta's score for how well it can match your events to real users. Adding hashed email, phone, and external IDs pushes EMQ from 4-5 to 7-8+.
3. Privacy Compliance
Server-side events give you more control over what data is sent. You can hash PII before transmission, apply consent rules, and keep the data flow auditable.
What to Send
Start with the four highest-value events:
- Purchase — completed transactions with order value
- Lead — form submissions or inquiries
- CompleteRegistration — account signups
- AddToCart — cart adds for e-commerce
Each event should include:
- event_id — unique ID for deduplication with the browser pixel
- event_time — Unix timestamp
- event_source_url — the page where it happened
- action_source — typically
website
For better EMQ, also include:
- Hashed email (SHA-256)
- Hashed phone (SHA-256)
- External ID (your own user ID)
- Client IP and User Agent (from the request)
- fbp and fbc cookies (Meta's own identifiers)
Deduplication: The Key to Clean Data
When both the browser pixel and CAPI send the same event, Meta needs to know they are the same event — not two separate ones.
The solution: use the same event_id on both sides.
Here is the flow:
- User completes a purchase
- Your browser pixel fires with
event_id: "abc123" - Your server receives the order and sends a CAPI event with
event_id: "abc123" - Meta sees both events, matches them by
event_id, and counts them as one
If you skip the event_id, Meta counts both events. Your conversion numbers double. That is worse than losing signals.
event_id between browser and server.
How to Set It Up
There are three common approaches:
Option 1: Server-Side GTM (sGTM)
Set up a server container in Google Tag Manager, forward events from the browser to sGTM, then sGTM sends them to Meta CAPI.
- Best for: complex setups with multiple platforms
- Cost: requires a server (Cloud Run, Cloudflare Workers, etc.)
- Time: 4-8 hours for first setup
Option 2: Direct API Integration
Your backend sends events directly to Meta CAPI via HTTP POST.
- Best for: custom apps with full backend control
- Cost: no additional infrastructure if you have a server
- Time: 2-4 hours if your backend is already set up
Option 3: Cloudflare Zaraz
Use Cloudflare's native server-side tag manager to send events to Meta CAPI without any server setup.
- Best for: sites hosted on Cloudflare
- Cost: free (part of Cloudflare)
- Time: 30-60 minutes
For most small and mid-sized businesses on Cloudflare, Zaraz is the simplest path.
Testing Your Setup
Once CAPI is running, verify it:
- Open Meta Events Manager
- Select your pixel
- Go to Test Events
- Trigger a test purchase or lead
- Confirm both the browser pixel and the CAPI event appear
- Check that the
event_idmatches on both - Wait 24 hours, then review Event Match Quality
Common Mistakes
Mistake 1: No event_id
Doubles your conversions. Always match the ID.
Mistake 2: Sending Unhashed PII
Meta requires email and phone to be SHA-256 hashed before transmission. Sending raw PII violates their policy and can get your pixel flagged.
Mistake 3: Wrong event_time
Events older than 7 days are dropped by Meta. Make sure event_time is accurate.
Mistake 4: Missing action_source
Meta rejects events without action_source. For websites, use website.
What Event Match Quality to Aim For
EMQ is scored 1-10. Realistic targets:
- 4-5 — baseline for pixel-only
- 6-7 — good CAPI setup with email or phone hashes
- 8-9 — excellent, includes multiple identifiers
- 10 — rare, requires very rich data
Getting from 4 to 7 is usually the biggest win. Beyond 7, returns diminish.
The Real Takeaway
Meta CAPI is not optional anymore. If you are running paid ads and relying on browser pixels alone, you are losing a significant share of your data.
The setup takes a few hours. The impact lasts as long as you run ads.
Start with Purchase and Lead events, get deduplication right, and push EMQ above 6. Everything else can be added later.